7 tips for Residential Framing in Sketchup (VIDEO)

Matt DonleyNews, Tips & Tricks

Usually, I’ll create step by step videos showing how to do something in Sketchup. This time, I thought it would be cool to just record my screen as I created a small addition using Sketchup. It was entirely unplanned, so you’ll see some things I tripped up on, but in general you’ll learn a little bit about the methods I use when creating residential structures in Sketchup.

How to build a (real) house in Sketchup

When most people start out with Sketchup, they usually begin by building a house. They start with a rectangle, push/pull it up, add a ridge and move it up to make a roof. Then they might add some windows and doors to make it look more realistic. But what if you wanted to build a structure in real life? I hollow box isn’t really going to provide you with any real valuable information. In this case, you can use Sketchup to build a house in the same way you’d build it in real life; one board at a time.

I wanted to create a video that showed you exactly how I would approach a project like this in Sketchup. I hit record, and just started building. I didn’t hit pause when I made a mistake, I just went with it. I wanted to show you where I tripped up. And I hope you can give me some tips on how to improve as well! I’m always interested in hearing about different ways people do things in Sketchup. You can view the video at the bottom of this post.

Now remember, just because you have a scalpel, it doesn’t make you a brain surgeon. The same applies here. Just because you have the tool to build it, doesn’t mean you understand all the building codes required in your area. Always consult with a professional when designing any construction project.

Click the model below to navigate the model in 3D right in your Browser. Create your own account at Sketchfab to upload your own models.

7 tips for drawing Residential Framing

  1. Create the “ground” first

    Before you do anything, (yes, even before you delete Susan), create a rectangle from the origin. Make it about twice as big as your expected working area, and turn it into a group. You don’t need to push/pull it or anything. It’s just there to help you navigate easier. It provides a flat reference point for using the tape measure tool and it keeps you from accidentally zooming in past your model.

    Have you ever been zooming in to a small detail on your model, and accidentally moved your mouse pointer off of the detail and zoomed WAY past it and gotten all screwed up? Having a “floor” in place will prevent some of that from happening. Sketchup zooms progressively based off of what you’re mouse pointer is hovering over. The closer the camera is to the object your mouse is over, the slower the zoom increment. The further away the object is, the faster the zoom rate. So by having a false floor group directly behind where you’re most commonly zooming, it will prevent some of those accidental zoom spikes.

  2. Make a flat floor plan for reference

    If you have some fixed dimensions you’re working with, now is a great time to just create a 2D floor plan (separate from the rectangle we made in tip #1). I like to create a rectangle of the largest dimension I’ll need, then “cut out” the other dimensions from that. Use the tape measure tool to create reference points and intersections. Then use the line tool to draw where the walls are. Save this floor plan as a group. Then, build your floor structure on top of this floor plan, using your lines and dimensions as reference points.

How To Set Up Your Sketchup Model For Layout – (VIDEO)

Matt DonleyLayout Tutorials, News, Sketchup Tutorials

If you have Sketchup Pro, you have Layout. It’s the companion software package for Sketchup that helps you prepare your model in 2D perspective views for printing out on paper. One of the most common tasks you’ll have to do for Layout is prepare your model for importing. It’s easy, and it’s best to spend a little more time in Sketchup to configure your scenes before you even open Layout.

Prepare Scenes in Sketchup FIRST, then import into Layout

Layout does have some built in camera tools, allowing you to “open” your imported Sketchup model right from Layout and orbit the model. But you just don’t have as much control as you do from Sketchup. So as you’re planning out your Layout document, think about what types of views you’ll want to get, then open your model in Sketchup to find those views and save them as scenes.

When you are using Sketchup for architecture or construction, you’ll find there are many views you need to capture from each model. Make sure you label each scene as you create it so you can reference the name when selecting it in Layout. These are some typical views I like to configure, then save as scenes in Sketchup.

  1. Modeling View – This is just a scene to save my default modeling settings. As you start configuring your other scenes, you’ll want to go back to modeling and this scene will get you back there fast.
  2. Top View – Bird’s eye view from directly over head. You can just select the preset top view button in Sketchup. Don’t worry if the view is not rotated correctly. You can easily rotate it in Layout.
  3. Perspective View – I like to put a nice 3D “Sketchy” perspective view right on the front page of the drawings. I usually crank the field of view up to 60 to get a nice perspective view. (Camera --> Field of View --> 60)
  4. Elevation views – Most of the pages will be elevation views. (Elevation views are the perspectives as if you are standing directly in front of something, looking straight at it.) You’ll typically have multiple elevations in a drawing set.

5 Reasons Trimble Will Master Sketchup

Matt DonleyNews

Ever since the announcement that Google was selling Sketchup, the 3D modeling world went into panic mode. There was a lot of uncertainty over what Trimble would do with Sketchup, and if they would be capable or willing to continue developing Sketchup into the best 3D modeling program. I want to share with you, 5 Trimble companies that are already doing fantastic things in the 3D modeling industry. This portfolio of accomplishments can serve as proof that Trimble will do great things with Sketchup.

5 Noteworthy Trimble Products

Trimble is well known in the construction industry. They have created the standard for providing project management tools and capturing field data. Not only do they have experience with 3D modeling software, but they also have a number of 3D scanning devices that can create a 3D model by scanning an environment with a laser. Here are 5 of the most interesting Trimble products currently being used.

  1. Trimble Indoor Mobile Mapping Solution (3D laser scanner)


    An incredible example of Trimble’s capable technology, I introduce the Trimble Indoor Mapping Solution (TIMMS). This device can produce a 2D/3D map and model of an interior space. It uses dual LiDAR technology to collect 27,000 data points per second. It is housed within a cart that has wheels and is manually pushed around the building to capture 360° coverage of the area. The model is even geo-located so the building’s real world location is recorded, similar to placing a Sketchup model in Google Earth. It has been used in applications such as situational awareness, emergency response, and in construction for creating floor plans. It has mapped the following infrastucture:

    • High Rise office buildings
    • Plant and factory facilities
    • Airports, train stations and other transport facilities
    • Public event spaces such as music halls, theatres, and auditoriums
    • Underground mines and tunnels

    Once a scan is completed, a complete set of floor plans can be produced. This saves an incredible amount of time when compared to manually measuring and drawing a building. Think of this as a Google Street view camera, but instead of just taking pictures, it also laser scans the environment for geometrical data too.

Share 2D Sketchup Models with ScreenHunter

Matt DonleyNews, Tips & Tricks

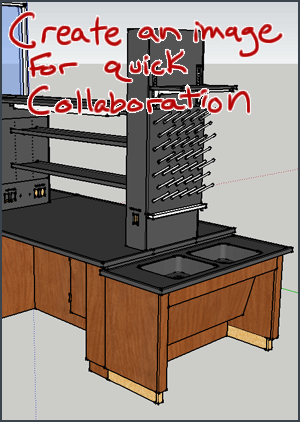
Sketchup can be categorized as a communication tool. It allows people to take their ideas and communicate them to others in the form of a visual model. Sometimes I struggle with how to share my models with other people in a way that communicates exactly what I want to show them. In this post, I will show you how to take 2D screenshots of your Sketchup model using a free program called ScreenHunter.

Exporting a Sketchup Model as a 2D Image

Sketchup image
Even though Sketchup is a 3D modeling tool, sometimes we just want to export a 2D image of our model to share with other people. It’s a quick way to show someone a part of your model. It’s great if you are working on a design for a client, or if you are collaborating on a project with a team. An image allows you to isolate a specific part of your model and capture a perspective that you can share with your partners and discuss.

Why create a 2D image of a 3D model?

  • You can share your model with people who don’t have Sketchup, or don’t know how to use it.
  • Viewing an image of a model on a mobile device is easier, and uses less bandwidth
  • Posting to forums and social sites like Facebook is easy
  • It gives you the control to deliver a specific perspective view of your model
  • It eliminates people from looking at other parts of your model that weren’t drawn to scale, or were intentionally inaccurate to save time

Sketchup has a built in 2D export utility, but there is a better way! I like to use ScreenHunter, by Wisdom Software (ScreenHunter info from Wisdom Software ). It’s a Windows program, sorry Mac users.

Design Pinewood Derby Cars With Symmetry in Sketchup

Matt DonleyNews, Sketchup Tutorials

Symmetry can be found everywhere. It can be found in man-made design and in nature. Sketchup has a very easy way to help you model symmetrical. This is perfect if you are looking to model your Pinewood Derby car in Sketchup. If not, these same principles can be used in many different modeling applications.

Reflection symmetry

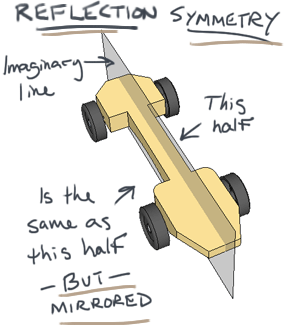
Think of a butterfly. Each wing is symmetrical to the other. This means that they are both shaped exactly the same way, but mirrored to each other. So when the butterfly folds it’s wings together, they match perfectly. This is called reflection symmetry, or bilateral symmetry.

As the wings of a butterfly can be thought of as a flat, 2D shape, reflection symmetry can apply to a 3D shape as well. Most cars are symmetrical. If you were to split a car down the middle from front to back, each half would be symmetrical to each other.

Reflection symmetry can be easily achieved using reflected Components within Sketchup.

What is 3D Printing?

Matt Donley3D Printing, Fabrication, News

Since getting into 3D modeling, I have always been fascinated with the idea of being able to create real-life objects from my digital models. I haven’t had a chance to try it out, but I recently attended a local 3D printing meeting at AS220 Labs, in Providence, RI. It was my first time ever seeing a 3D printer in real life, and I learned so much in one night I thought I’d share my experience.

The Local “Hackerspace”

When I walked in to the AS220 Labs, I could tell I was in the right place. I saw a miniature laser cut wooden trebuchet sitting on a table, loaded with mini tennis balls. There was a shiny new shop bot in the back of the space, getting ready to be set up. And there was the crowd of people, circled around a table, watching some kind of contraption whizzing away.

It was a 3D printer. The first 3D printer I’ve ever seen in person. And it was printing away at multiple copies of “mustache rings” (More on that later).

As people scooted aside to invite me into the circle, I watched in amazement as this little machine was “printing” out a 3D object. It’s really quite mesmerizing to watch it in action.

I found out about the 3D printer meeting organized by Matt Stultz from 3DPPVD on the Make website. It’s a blog/magazine that’s all about making things. It’s a really great resource for anyone who is into personal fabrication, DIY, electronics, etc. They also host the Maker Faire, which is an event that encourages the creativity within everyone to make things. There are a number of “mini” Maker Faires all over the world so you’re likely to find one near you.

Why Google Doesn’t NEED Sketchup Anymore

Matt DonleyNews, Tips & Tricks

Sketchup has always been known as an easy to use 3D modeling tool. With its intuitive interface, it has claimed the motto “3D modeling for everyone.” With the recent acquisition of Sketchup by Trimble, Sketchup is no longer under the Google umbrella. Many people have wondered why Google sold it. But to answer that question, you must first understand why Google bought it in the first place.

Google’s quest to model the world

Google has an ongoing, ambitious goal of mapping the world. This vision is delivered via Google Maps, and Google Earth. The two programs share many similarities in the way they show maps and satellite imagery. While I don’t want to go into great detail about the features and differences between the two programs, the main distinction is that Google Maps is a web based application, and Google Earth is a program that gets installed on your computer.

In 2004, Google announced that it had acquired Keyhole Corp, a digital mapping company. The technology from Keyhole is what became the beginning of Google Earth and Google Maps.

Fun Fact – If you go to www.keyhole.com, it refreshes to the Google Earth website.

Google Earth started out as a 3D model of the globe, with 2D satellite imagery pasted continuously on the surface. Even though there was some terrain data integrated into the 3D part of Google Earth, the images were still pasted flat to the surface. Therefore, if you were to fly over a city, all the tall buildings and land features would appear flat on the ground.

3D buildings in Google Earth


In 2005, Google started to extrude the outlines of buildings in order to create a rough 3D model. There were no textures applied, and a lot of the building details were lost. All the buildings had the same grey looking surface. It lacked realism.

Google realized they would need to do something else in order to take their 3D model of the world to the next level. At the time, the only way to create a realistic model of a building was to manually create each one. It would cost way too much to hire people to create all these models, so instead Google looked to the community to create the models for them.

Enter Sketchup.

Interview with Matt Jackson from The Fine Homebuilding Digital Jobsite Blog

Matt DonleyNews, Tips & Tricks

If you’re a carpenter or contractor, you’ve probably heard of Fine Homebuilding. It’s one of leading magazines for residential construction professionals. I had a subscription for many years when I had my own construction company. The thing I loved about the magazine was each issue was packed with real tips on how to approach real carpentry challenges.

They go beyond the basic stuff you’d typically find in a DIY type magazine, and they teach you not only the best way to do something, but WHY it’s the best way to do it. Matt Jackson is the Sketchup guru over at Fine Homebuilding, where he publishes video tutorials and articles on how to use Sketchup to design and plan construction projects.

The Digital Jobsite Blog

Matt runs the Sketchup blog over at Fine Homebuilding, appropriately named “The Digital Jobsite Blog.” And with a tagline “Where the boards are straight, the weather’s great, and there really IS a board stretcher!” it describes the Sketchup workspace perfectly. (For those of you who are not carpenters, it’s the #1 all time favorite prank to pull on the “new kid” on the jobsite to tell them to go fetch the “board stretcher”. Which usually leads the poor lad on a wild goose chase asking everyone where the board stretcher is, until he realizes there’s no such thing!) Yes, I fell for that one on my first day too!

Sketchup Tutorial | How to create a vase

Matt DonleyNews, Sketchup Tutorials

This is a step by step tutorial on how to create a simple vase in Sketchup. It will provide you with a good understanding of the Arc Tool Arc Tool (A), Offset Tool Offset tool (F), and the Follow Me Tool Follow Me tool . No Sketchup experience is necessary to follow this tutorial.

To start modeling a vase, you need to create a profile outline of the vase. We will then extrude the profile around a circle path to create the vase. Sketchup makes this task pretty easy using the Follow Me Tool Follow Me tool. You might want to look for a picture of a vase, or go find one in your house. It really helps to have something in front of you that can guide you with modeling proportions.

Watch the video, or follow the step by step directions below.

Step 1 – Draw a Rectangle

Before you start drawing the profile, it’s a good idea to just create a surface that you can draw on. It just makes it a lot easier for the drawing tools to inference the same plane when you have a face to drawn on. Go ahead and create an upright rectangle, and turn it into a group so our profile doesn’t stick to it.

Sketchup Tutorial | How to use Keyboard Shortcuts to Speed up your Navigation

Matt DonleyNews, Tips & Tricks

Using keyboard shortcuts can save you a significant amount of time during modeling. It is a way to make the modeling process more natural and artistic, as opposed to technical and programmatic. When you learn keyboard shortcuts and commit them to memory, your hands will “remember” what key to press instinctively.

The really cool thing about Sketchup, is that it allows you to create your own custom keyboard shortcuts so you can create an optimal interface to fit the way you use Sketchup.

Why learn Shortcuts?

Think about when you type on the keyboard. You know what letters you need to press, but you don’t have to think about where the letters are. You just know where they are and your hands start typing away. It’s the same muscle memory that makes learning the keyboard shortcuts so beneficial. Instead of using the mouse to select a tool from the drop down menu or the toolbar, you use your non-mouse hand to select it on the keyboard. This keeps the mouse in the modeling screen where all the action happens.

Watch the video below to learn how I use two custom shortcuts to speed up my navigation in Sketchup.