8 Tips for 3D Printing with Sketchup

3D Printing, Fabrication, News, Tips & Tricks

I am new to the world of 3D printing. So in this guest article, you’ll hear from expert 3D printer/designer Marcus Ritland from Denali 3D Design. He shares some tips to help you create amazing 3D printed models by designing them in Sketchup.

3D Printing

3D printing is awesome – we can all agree on that. You send a 3D computer model to a machine and out comes a finished part, ready to use as an end product or as a prototype before mass manufacturing. With the rise of personal 3D printers like the Makerbot Replicator 2, and 3D print services like Shapeways and Ponoko, nearly everyone has access to this technology.

But how does one get started making awesome models for 3D printing? Its one thing to make a model look good on the screen, but quite another to make a model that looks good and actually works in real life. The process of modeling for 3D printing is much the same as 3D modeling anything else, but with a few specific requirements. Here are some common problems that I see beginners struggling with and how to address them.

Tips for modeling in Sketchup

  1. Make your model “Solid” in Sketchup to be 3D Printable
  2. Models must be “Solid” to be 3D printable. This is by far the most common problem beginners have when modeling for 3D printing. Here are some examples of Solid Sketchup models.

    Solid, sometimes called “watertight” or “manifold” simply means the model is a complete enclosure. If you were to fill it with water, none would drain out, and the model must not have any extra lines or faces. If you make your object into a group or component, Sketchup will indicate when its solid in the Entity Info dialog box (Window > Entity Info).

    Another way to define solid: Every edge in your model must be bordered by exactly two faces. If an edge has less than two faces bordering it, there is an adjacent hole, and if there are more than two faces touching an edge, there is an extra face that needs to be deleted.

    The most common errors (and the corresponding solutions) are:

    • Stray edges (just delete them)
    • Holes (trace an edge to fill them)
    • Internal faces (delete them)

Sketchup 3D Basecamp 2012

Matt DonleyNews, Tips & Tricks

I am currently in Boulder, CO attending my first ever Basecamp conference. We just finished the first day of the conference, and I wanted to give a run down on what happened at today’s events, and share some of the announcements made at today’s session.

Trimble remains committed to the Sketchup community


Ever since the acquisition of Sketchup by Trimble, there has been a ton of speculation over what their intentions were in taking over the software. Today, we got to hear from Sketchup Product Management Director John Bacus and Trimble Vice President Bryn Fosburgh about the acquisition and their plans for Sketchup.

One thing is very clear. Trimble remains committed to the Sketchup community and plans to continue offering a free version of Sketchup. However, there were some hints that in the future there may be greater differences in the functionality of the free version when compared to the Pro version. But don’t expect any major changes any time soon.

Trimble plans on continuing to develop Sketchup as a leading 3D modeling program, with more attention given to the architectural community. But at the same time, they want to expand upon their existing support platform enabling third party developers to create specialized plugins and extensions. They also plan on using Sketchup as a platform for their existing specialized 3D modeling software packages, as well as allowing Trimble to expand into additional markets with other specialized 3D modeling software.

Sketchup Tutorial – Create a Custom Bracket for 3D Printing

Matt DonleyFabrication, News, Sketchup Tutorials

After coming back from the Maker Faire in NY, one thing that really surprised me was how popular 3D printing is becoming. These days, you can purchase a 3D printer for under a thousand dollars and actually print out a real object from your digital model. I’ve been learning a little bit about 3D printing at the AS220 labs, but I have yet to purchase my own 3D printer. Regardless, I wanted to show you how easy it is to use Sketchup to create a simple bracket that you can print out on a 3D printer.

Rapid Desktop Prototyping

While at the Maker Faire, I had the honor of meeting many of the Trimble team members who develop Sketchup. They had a few 3D printers set up at their tent so they could show people how you could model something in Sketchup, then print it out instantly on the 3D printer. At one point they were presented with an engineering challenge.

The man in charge of connecting everybody with Wifi at the faire had a problem. He was looking to mount a piece of hardware to a round pole and looked to the Sketchup guys to come up with a solution. They were able to model something quickly in Sketchup, and print it out for him so he could mount the gear to the pole. The first prototype actually snapped during a stress test, so they just made some modifications to the design and printed out another one. How cool is that?

Creating a simple bracket in Sketchup is easy. In this tutorial, we’ll model a base plate with two arms. Now, unfortunately, I don’t have a 3D printer so I won’t be printing this out. I know, that’s lame. But you can use the same concepts in the design of this bracket to make any custom bracket for your needs.

Sketchup Tutorial – Custom Bracket

  1. Draw the Base

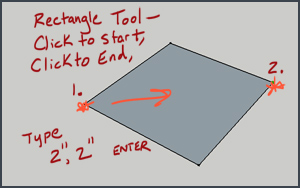
    Starting with the Rectangle Tool (R), Click once to start the rectangle, then move the mouse out and click again to finish the rectangle. To specify a precise dimension, type in 2",2" then press ENTER.

    Remember, you can also type in your dimensions right after your first click when you start the rectangle. It’s your choice. I like to do it after because sometimes I’ll accidentally move my mouse as I’m typing in a number and it will clear whatever I just typed in.

  2. Extrude the Base

    Using the Push/Pull Tool (P), extrude the rectangle into a 3D object. Click once on the surface of the rectangle to start, then pull up. Click again to finish. Type in 1/4" then ENTER to specify the height at 1/4″.

Sketchup Groups and the Outliner Tutorial

Matt DonleyNews, Sketchup Tutorials

Learning how to effectively use groups is one of the most important things you should know about Sketchup. The Outliner provides a way for you to keep track of all the groups you have made in the model by assigning a name to them, and viewing the hierarchy of how they are organized.

Groups provide organization


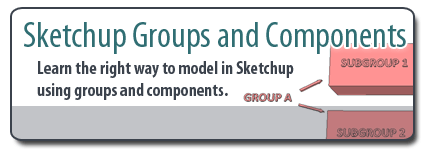
If you are making any type of complex model in Sketchup, you should be using groups to separate the parts of your model. Not only does grouping quarantine geometry from the rest of the model, but it also allows you to hide other parts of the model you aren’t currently working on, increasing your processing speed.

Components are very similar to groups, except that each instance of a component is an exact replica of one another. If any changes are made to one component, all copies of that component reflect those changes as well. Groups are independent from one another, meaning that once you’ve created a copy, you can edit one of them and the changes do not affect the other instances of that similar group. Each one is independent from the next.

For the sake of this article, we will be talking mostly about groups, but you should understand the differences between the two. However, the bounding box system acts the same whether it is a component or a group, so I don’t need to differentiate between the two in this context.

GroupsA collection of faces and edges within a model that are isolated from other parts of the model.

  • Anything protected in a group cannot by affected by any geometry outside of that group.
  • To manipulate faces or edges within a group, or to add geometry to a group, that group must first be “activated” by double clicking on it.
  • If you draw a shape on something that is in a group, it won’t “stick” to the object unless you open the group first.
  • Groups can contain “loose geometry”, guides, section planes, dimensions, text, or other groups.
  • Groups can be manipulated as an assembly. (Move, rotate, scale, paint, copy, etc)
  • Groups have their own independent 3-axis from the rest of the model, and it can be reoriented
  • Copies of groups are independent from one another. Once a copy is made, any changes made to one instance of that group do NOT affect the other copies of that group.

ComponentsSimilar to groups, except that each copy of a component remains identical to its original. Any changes made to an instance of a component are automatically reflected to each instance of that component.

  • If you want to make an instance of a component unique from its counterparts, you can right click it, and select “Make Unique”.

It’s Youtube for 3D Models

Matt DonleyNews, Sketchup Tutorials

Most of us know about the 3D warehouse, where you can upload your Sketchup models and share them with the world. But what if you wanted to upload you models not so other people could download them, but so they could interact with your model right from their browser?

Showcase your 3D models with Sketchfab

Sketchfab Website
If you noticed in my last post, I had embedded a model of a house I built in Sketchup. The cool thing was that you could actually interact with the model by orbiting and zooming around. And it works REALLY well.

How did I do this? I uploaded my model to my account on Sketchfab. Once you upload, your model will show up on your dashboard, and you can copy and paste the embed code onto any website. The great part is that the end user does not need to download any special plugins. Since Sketchfab is built on WebGL technology, they only need to have a modern browser like Google Chrome, Mozilla Firefox, or Microsoft Internet Explorer.

Sketchfab embed example:

Here’s the new Iphone 5, as modeled by Mestaty. Just click and drag the model to orbit. Scroll to zoom, and middle mouse button click to pan.

Sketchfab offers a free account that allows you to upload 10 models. For about $12/mo, you can upgrade to Pro and Sketchfab will host up to 100 models for you. The thing I really like about Sketchfab is how simple it is to use. Everything just works!

How to upload your model to Sketchfab

  1. Create an account on Sketchfab Go to Sketchfab and create your own account. Currently, you can login with your existing Twitter or Google account, making the setup that much easier. (I used my Google Account to login with. It’s nice because as long as you’re logged in under your Google account, you’ll never have to fill out a username and password when you go to Sketchfab.)
  2. Download the Sketchup Exporter/Uploader Sketchfab has an Uploader plugin for Sketchup, thanks to a Sketchfab fan, Alex Schreyer. This makes it very easy to upload your model to your Sketchfab account right from the file menu in Sketchup.

7 tips for Residential Framing in Sketchup (VIDEO)

Matt DonleyNews, Tips & Tricks

Usually, I’ll create step by step videos showing how to do something in Sketchup. This time, I thought it would be cool to just record my screen as I created a small addition using Sketchup. It was entirely unplanned, so you’ll see some things I tripped up on, but in general you’ll learn a little bit about the methods I use when creating residential structures in Sketchup.

How to build a (real) house in Sketchup

When most people start out with Sketchup, they usually begin by building a house. They start with a rectangle, push/pull it up, add a ridge and move it up to make a roof. Then they might add some windows and doors to make it look more realistic. But what if you wanted to build a structure in real life? I hollow box isn’t really going to provide you with any real valuable information. In this case, you can use Sketchup to build a house in the same way you’d build it in real life; one board at a time.

I wanted to create a video that showed you exactly how I would approach a project like this in Sketchup. I hit record, and just started building. I didn’t hit pause when I made a mistake, I just went with it. I wanted to show you where I tripped up. And I hope you can give me some tips on how to improve as well! I’m always interested in hearing about different ways people do things in Sketchup. You can view the video at the bottom of this post.

Now remember, just because you have a scalpel, it doesn’t make you a brain surgeon. The same applies here. Just because you have the tool to build it, doesn’t mean you understand all the building codes required in your area. Always consult with a professional when designing any construction project.

Click the model below to navigate the model in 3D right in your Browser. Create your own account at Sketchfab to upload your own models.

7 tips for drawing Residential Framing

  1. Create the “ground” first

    Before you do anything, (yes, even before you delete Susan), create a rectangle from the origin. Make it about twice as big as your expected working area, and turn it into a group. You don’t need to push/pull it or anything. It’s just there to help you navigate easier. It provides a flat reference point for using the tape measure tool and it keeps you from accidentally zooming in past your model.

    Have you ever been zooming in to a small detail on your model, and accidentally moved your mouse pointer off of the detail and zoomed WAY past it and gotten all screwed up? Having a “floor” in place will prevent some of that from happening. Sketchup zooms progressively based off of what you’re mouse pointer is hovering over. The closer the camera is to the object your mouse is over, the slower the zoom increment. The further away the object is, the faster the zoom rate. So by having a false floor group directly behind where you’re most commonly zooming, it will prevent some of those accidental zoom spikes.

  2. Make a flat floor plan for reference

    If you have some fixed dimensions you’re working with, now is a great time to just create a 2D floor plan (separate from the rectangle we made in tip #1). I like to create a rectangle of the largest dimension I’ll need, then “cut out” the other dimensions from that. Use the tape measure tool to create reference points and intersections. Then use the line tool to draw where the walls are. Save this floor plan as a group. Then, build your floor structure on top of this floor plan, using your lines and dimensions as reference points.

How To Set Up Your Sketchup Model For Layout – (VIDEO)

Matt DonleyLayout Tutorials, News, Sketchup Tutorials

If you have Sketchup Pro, you have Layout. It’s the companion software package for Sketchup that helps you prepare your model in 2D perspective views for printing out on paper. One of the most common tasks you’ll have to do for Layout is prepare your model for importing. It’s easy, and it’s best to spend a little more time in Sketchup to configure your scenes before you even open Layout.

Prepare Scenes in Sketchup FIRST, then import into Layout

Layout does have some built in camera tools, allowing you to “open” your imported Sketchup model right from Layout and orbit the model. But you just don’t have as much control as you do from Sketchup. So as you’re planning out your Layout document, think about what types of views you’ll want to get, then open your model in Sketchup to find those views and save them as scenes.

When you are using Sketchup for architecture or construction, you’ll find there are many views you need to capture from each model. Make sure you label each scene as you create it so you can reference the name when selecting it in Layout. These are some typical views I like to configure, then save as scenes in Sketchup.

  1. Modeling View – This is just a scene to save my default modeling settings. As you start configuring your other scenes, you’ll want to go back to modeling and this scene will get you back there fast.
  2. Top View – Bird’s eye view from directly over head. You can just select the preset top view button in Sketchup. Don’t worry if the view is not rotated correctly. You can easily rotate it in Layout.
  3. Perspective View – I like to put a nice 3D “Sketchy” perspective view right on the front page of the drawings. I usually crank the field of view up to 60 to get a nice perspective view. (Camera --> Field of View --> 60)
  4. Elevation views – Most of the pages will be elevation views. (Elevation views are the perspectives as if you are standing directly in front of something, looking straight at it.) You’ll typically have multiple elevations in a drawing set.

5 Reasons Trimble Will Master Sketchup

Matt DonleyNews

Ever since the announcement that Google was selling Sketchup, the 3D modeling world went into panic mode. There was a lot of uncertainty over what Trimble would do with Sketchup, and if they would be capable or willing to continue developing Sketchup into the best 3D modeling program. I want to share with you, 5 Trimble companies that are already doing fantastic things in the 3D modeling industry. This portfolio of accomplishments can serve as proof that Trimble will do great things with Sketchup.

5 Noteworthy Trimble Products

Trimble is well known in the construction industry. They have created the standard for providing project management tools and capturing field data. Not only do they have experience with 3D modeling software, but they also have a number of 3D scanning devices that can create a 3D model by scanning an environment with a laser. Here are 5 of the most interesting Trimble products currently being used.

  1. Trimble Indoor Mobile Mapping Solution (3D laser scanner)


    An incredible example of Trimble’s capable technology, I introduce the Trimble Indoor Mapping Solution (TIMMS). This device can produce a 2D/3D map and model of an interior space. It uses dual LiDAR technology to collect 27,000 data points per second. It is housed within a cart that has wheels and is manually pushed around the building to capture 360° coverage of the area. The model is even geo-located so the building’s real world location is recorded, similar to placing a Sketchup model in Google Earth. It has been used in applications such as situational awareness, emergency response, and in construction for creating floor plans. It has mapped the following infrastucture:

    • High Rise office buildings
    • Plant and factory facilities
    • Airports, train stations and other transport facilities
    • Public event spaces such as music halls, theatres, and auditoriums
    • Underground mines and tunnels

    Once a scan is completed, a complete set of floor plans can be produced. This saves an incredible amount of time when compared to manually measuring and drawing a building. Think of this as a Google Street view camera, but instead of just taking pictures, it also laser scans the environment for geometrical data too.

Share 2D Sketchup Models with ScreenHunter

Matt DonleyNews, Tips & Tricks

Sketchup can be categorized as a communication tool. It allows people to take their ideas and communicate them to others in the form of a visual model. Sometimes I struggle with how to share my models with other people in a way that communicates exactly what I want to show them. In this post, I will show you how to take 2D screenshots of your Sketchup model using a free program called ScreenHunter.

Exporting a Sketchup Model as a 2D Image

Sketchup image
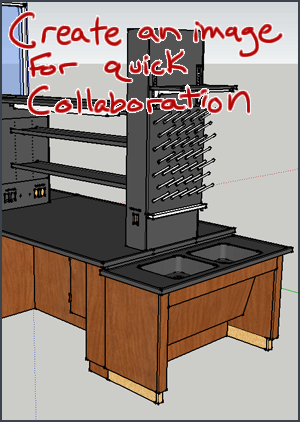
Even though Sketchup is a 3D modeling tool, sometimes we just want to export a 2D image of our model to share with other people. It’s a quick way to show someone a part of your model. It’s great if you are working on a design for a client, or if you are collaborating on a project with a team. An image allows you to isolate a specific part of your model and capture a perspective that you can share with your partners and discuss.

Why create a 2D image of a 3D model?

  • You can share your model with people who don’t have Sketchup, or don’t know how to use it.
  • Viewing an image of a model on a mobile device is easier, and uses less bandwidth
  • Posting to forums and social sites like Facebook is easy
  • It gives you the control to deliver a specific perspective view of your model
  • It eliminates people from looking at other parts of your model that weren’t drawn to scale, or were intentionally inaccurate to save time

Sketchup has a built in 2D export utility, but there is a better way! I like to use ScreenHunter, by Wisdom Software (ScreenHunter info from Wisdom Software ). It’s a Windows program, sorry Mac users.

Design Pinewood Derby Cars With Symmetry in Sketchup

Matt DonleyNews, Sketchup Tutorials

Symmetry can be found everywhere. It can be found in man-made design and in nature. Sketchup has a very easy way to help you model symmetrical. This is perfect if you are looking to model your Pinewood Derby car in Sketchup. If not, these same principles can be used in many different modeling applications.

Reflection symmetry

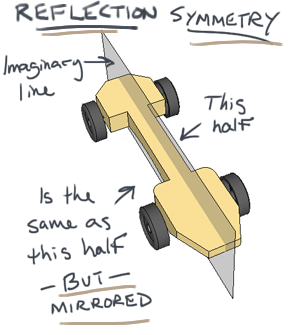
Think of a butterfly. Each wing is symmetrical to the other. This means that they are both shaped exactly the same way, but mirrored to each other. So when the butterfly folds it’s wings together, they match perfectly. This is called reflection symmetry, or bilateral symmetry.

As the wings of a butterfly can be thought of as a flat, 2D shape, reflection symmetry can apply to a 3D shape as well. Most cars are symmetrical. If you were to split a car down the middle from front to back, each half would be symmetrical to each other.

Reflection symmetry can be easily achieved using reflected Components within Sketchup.