So you’ve decided to give Sketchup a shot, and you want to learn how to create 3D models. Congratulations, I promise you will have a lot of fun using Sketchup, and it won’t take that long for you to learn how to get started. Sketchup has a very friendly interface and an intuitive navigation system so there’s not much of a learning curve.
Sketchup Tutorial For Beginners – Part One
In this video, I’ll introduce you to the basic tools and navigation in Sketchup. You’ll learn the Select tool, Move/Copy tool, Rectangle Tool, Line Tool, Move Tool, Orbit and Zoom, the Tape measure tool and the Push/Pull tool.
Tips for beginner modelers
For first time users, I recommend the following couple tips to make your Sketchup experience fun and rewarding.
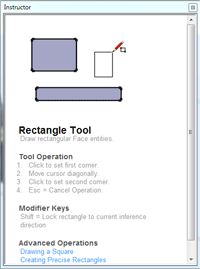
1. Use the built in Sketchup instructor window

Even after many years of experience with Sketchup, I find I’ll open up the instructor window every once in a while, to remind myself of some random action you can perform with a certain tool.
2. Look for tutorials online
Try to find a tutorial on how to model something specific in Sketchup. Don’t be afraid to push the limits on what you think you can handle. You’ll find that you’ll enjoy the challenge, and you’ll pick up unique tips that can only be found by modeling something different.
There’s also a big difference in your motivation level when you choose to model something you’re actually interested in. We can’t just make models of square houses and expect to stay interested, right?
There are a ton of Sketchup resources online with tutorials and training. You can also find great information right here on MasterSketchup.com. I am constantly updating the site with new tutorials and tips. If you want to be updated when I add new content to the site or post a new video to Youtube, sign up for my newsletter.
3. Get involved
Check out the many Sketchup forums online. Start a conversation about something you’re having trouble with. There are so many people out there who are happy to help you with any problems you’re having with Sketchup. Including me! Send me and email and I’ll try to point you in the right direction. Try joining a 3D challenge to sharpen your skills or upload your models to the 3D warehouse and share them with others. It’s a great way to get feedback from your peers about your models.
The point is, interact with other people out there who use Sketchup too! It will help motivate you to continue learning and get better. Looking at other people’s models can provide inspiration for your next project.
Sketchup Tutorial for Beginners – Part Two
After you learn the basic tools in Sketchup, the next thing you should learn is how to use groups and components. Some people feel like this is a more advanced feature to learn, but I disagree. I think it’s the most important feature to learn and use in Sketchup. The challenge is that it’s not a simple concept to understand, so many people shy away from it. I am going to try to make it as easy to understand as possible, but you have to promise me that you will learn this and use it before giving up.
Groups & Components and the Outliner
When you create anything in Sketchup besides the most basic shape, you’ll want to use groups or components to isolate the geometry of the different parts of your model within Sketchup. If you haven’t noticed already, things tend to “stick together” in Sketchup. This can be pretty frustrating at times. The way to prevent this from happening is to select a collection of entities, and turn them into a group.
To make a group you right click and select “Make group.” In the Outliner window, you will be able to see your new group show up. It’s best to rename your groups to something that is descriptive. It’s all about staying organized. And don’t forget, you can make a group within a group.
This is really helpful when are making something like a birdhouse, for example. You can have each side of the birdhouse in it’s own group, but then once you finish the birdhouse you can select all of the parts of the birdhouse, and consolidate them into another group. Now you can just click once on the birdhouse, to select the entire thing.
There are so many other advantages to using groups and components. Watch this video to learn more.
Sketchup Tutorials for Beginners – Part Three
Coming Soon
In the final video for getting started with Sketchup, we will discover some of the presentation tools built in to Sketchup. We’ll look at some of the different styles you can use to make your model look different. The bucket tool allows you to “paint” the faces within your model. And the section tool gives you the ability to “cut” your model in half to take a look at a cross section. Once you learn these final tools, you’ll have a good start with Sketchup and can begin learning some advanced techniques.


