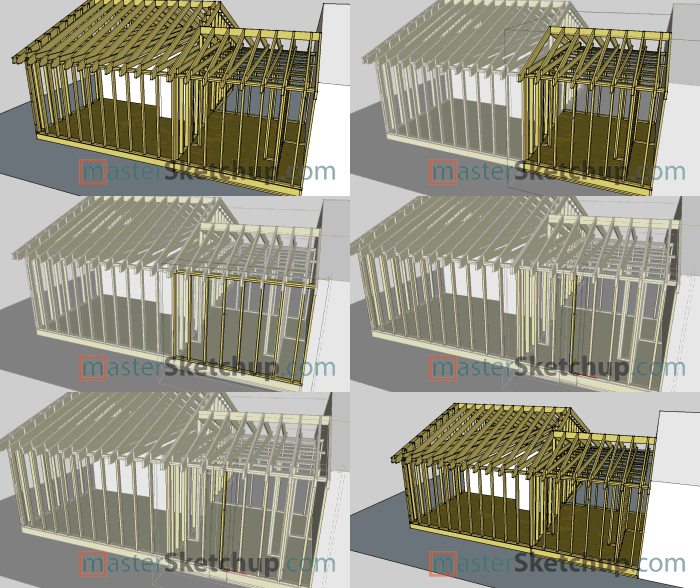
Usually, I’ll create step by step videos showing how to do something in Sketchup. This time, I thought it would be cool to just record my screen as I created a small addition using Sketchup. It was entirely unplanned, so you’ll see some things I tripped up on, but in general you’ll learn a little bit about the methods I use when creating residential structures in Sketchup.
How to build a (real) house in Sketchup
When most people start out with Sketchup, they usually begin by building a house. They start with a rectangle, push/pull it up, add a ridge and move it up to make a roof. Then they might add some windows and doors to make it look more realistic. But what if you wanted to build a structure in real life? I hollow box isn’t really going to provide you with any real valuable information. In this case, you can use Sketchup to build a house in the same way you’d build it in real life; one board at a time.
I wanted to create a video that showed you exactly how I would approach a project like this in Sketchup. I hit record, and just started building. I didn’t hit pause when I made a mistake, I just went with it. I wanted to show you where I tripped up. And I hope you can give me some tips on how to improve as well! I’m always interested in hearing about different ways people do things in Sketchup. You can view the video at the bottom of this post.
Now remember, just because you have a scalpel, it doesn’t make you a brain surgeon. The same applies here. Just because you have the tool to build it, doesn’t mean you understand all the building codes required in your area. Always consult with a professional when designing any construction project.
Click the model below to navigate the model in 3D right in your Browser. Create your own account at Sketchfab to upload your own models.
Addition
by Matt Donley
on Sketchfab
7 tips for drawing Residential Framing
-
Create the “ground” first
Before you do anything, (yes, even before you delete Susan), create a rectangle from the origin. Make it about twice as big as your expected working area, and turn it into a group. You don’t need to push/pull it or anything. It’s just there to help you navigate easier. It provides a flat reference point for using the tape measure tool and it keeps you from accidentally zooming in past your model.
Have you ever been zooming in to a small detail on your model, and accidentally moved your mouse pointer off of the detail and zoomed WAY past it and gotten all screwed up? Having a “floor” in place will prevent some of that from happening. Sketchup zooms progressively based off of what you’re mouse pointer is hovering over. The closer the camera is to the object your mouse is over, the slower the zoom increment. The further away the object is, the faster the zoom rate. So by having a false floor group directly behind where you’re most commonly zooming, it will prevent some of those accidental zoom spikes. -
Make a flat floor plan for reference
If you have some fixed dimensions you’re working with, now is a great time to just create a 2D floor plan (separate from the rectangle we made in tip #1). I like to create a rectangle of the largest dimension I’ll need, then “cut out” the other dimensions from that. Use the tape measure tool to create reference points and intersections. Then use the line tool to draw where the walls are. Save this floor plan as a group. Then, build your floor structure on top of this floor plan, using your lines and dimensions as reference points.
-
Decide on your level of detail
Your project will always be evolving from the moment you start to the moment you finish. It’s best to try to determine what level of detail is required before you get too far into it. For example, I know the exterior dimensions are pretty much fixed. But some of the inside walls have not been figured out yet. So for the exterior walls, I’ll draw each stud and make a wall structure. But for some of the interior walls, I might just create a rectangle, and push/pull it up to visualize a wall being there for now. This will make it much easier to change around until you figure out the final placement of the walls.
-
Know your groups and components
With residential framing in particular, you have to be careful about how you use groups and components. At first glance, you might say it would make sense to use components for all your floor joists. While most of them are the same size, you’ll always have a couple at each end that are a few inches longer than the rest. Also, if you need to frame a rough opening for stairs or something, you’ll have to resize those joists as well.I’ve screwed things up in the past by forgetting that a joist is a component, and I’ll edit it for a rough opening, then find out that all my joists are much shorter than before! So you can either make sure you choose unique components for each component you change, or you can just use groups for things like joists, and studs. Because of the simple geometry of a stud or joist, you aren’t using that much more processing power, and you can be sure you’re not inadvertently changing a part somewhere else in your model.
I’ve typically used a combination of these two methods. I’ll create a component for the main stud, but then each oddly sized stud I’ll just create a group for it. Another thing you can do is “lock” components once you’ve set them into position. This will prevent you from accidentally changing that component elsewhere in your model. You’ll get an error message if you try.
-
Use scaling carefully
The only way to change the shape of a component without affect other similar components is by using the Scale Tool. But keep in mind that if you scale an object, the material becomes stretched as well. One great way to use scaling is by creating an inverse copy of an object. This is useful when modeling roof details that need to be mirrored on the opposite side.
-
Make temporary templates
Don’t be afraid to create a number of temporary templates or mockups in your model. They are very useful when trying to reference a dimension. Remember, you can lock an axis when you are drawing or modifying by pressing an arrow key, or by holding shift. This allows you to reference ANY point in your model while maintaining a specific axis. Temporary guides are easily hidden or removed.
-
Use the Outliner to organize
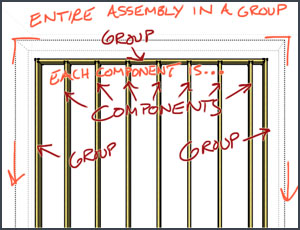
When you create any complex model, the key is to stay organized. Collecting objects into groups and using the Outliner window is essential in staying organized. Don’t be afraid to use a lot of groups in your model. There should be multiple steps through groups in order to edit geometry.For example, a stud should be made into it’s own group or component, to isolate its geometry from “sticking” to anything else. Then, after you create a wall, using multiple studs, you should select all of those studs and enclose them into a group. This makes it easier to move and manipulate the entire wall as a unit, instead of having to select each part of the wall. Then, you might have a collection of walls in a room that you might want to group together, that way you can label that room in the outliner.
Watch the video – Sketchup Tutorial – Residential Framing
Let me know what you’d do differently
I know someone’s got a comment out there about dynamic components. Let me know how you’d approach this differently by leaving a comment below.


